Lights Installation is a crucial factor since some lights are very complex to install, and some are straightforward and do not require any installation cost. LED recessed pot lights are easy to install due to their structure & design. Basically, Recessed LED Pot lights have below main components & with some knowledge & help of right tools you can easily install them yourself.
- LED Lighting Slim Panel
- Junction Box

- What should be the size of recessed light?
- How many recessed lights I need?
- What should be the distance from one light to the other?
- Do we need any housing for installing the light?
- How to drill a hole with Hole Saw with correct size?
- How hole saw is used for recessed lighting?
- What is the measurement of Junction box and LED Fixtures?
- Can these lights unplug from the junction box?
- What do I need to install them on the ceiling that is exposed to attic/roof?
- Do you need to change the bulb for recessed light?
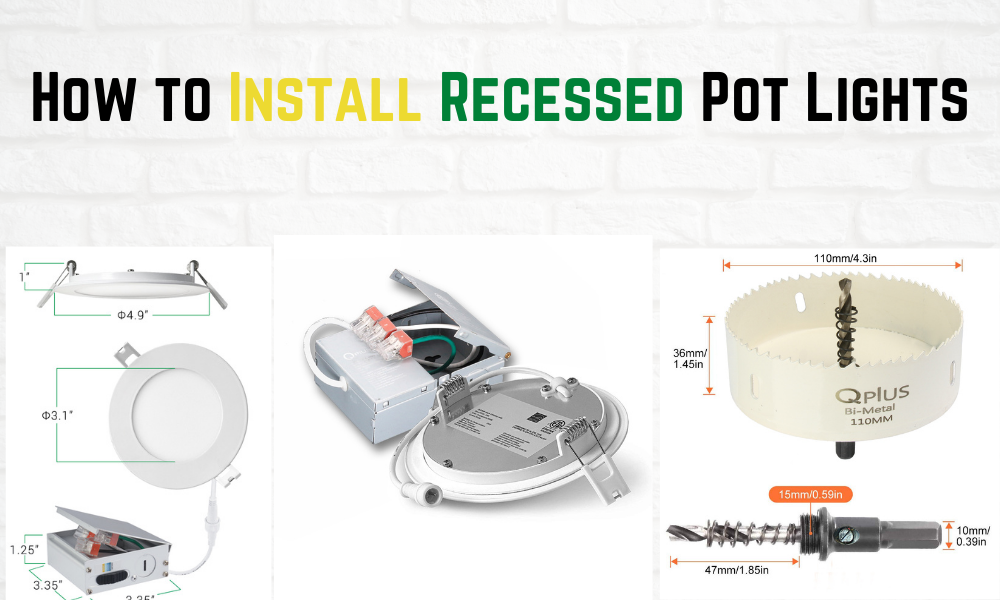
Supposedly, A recessed lighting fixture may have a diameter of 4 ¾ Inches and the gap between the clips maybe 4 ¼ inches. Furthermore, the Junction box may have a height of 1 ¼ " and a width and length of 3.37" Inches. In this scenario, we, we need a hole saw with 4.3 Inch diameter and 1.45 Inch height. It is very important to see the hole saw when buying the light fixtures. It makes the holes perfect and adjustable for the fixtures.

Once you finalize the size of lights & hole saw then You have to cut holes in the ceiling & follow the below given instructions.

Secondly, we will open the lid of the junction box and use the wire nuts to match the white wire from the line feed with the white wire of the junction box, same way we will match the black wire of the junction box and the line. Finally, we will match the copper wire from the feed with the green wire of the junction box. If we want, we can unplug it any time.

Thirdly, we will route the junction box through cut out and connect the recessed LED panel to junction box with the quick connector. If you are installing a color changing light, you can set up the color temperature in junction box with 5 options - 3000K / 4000K / 5000K / 6500K / Switch. When you set junction box switch to Auto mode, the light CCT changing option can be controlled using regular wall switch. If you don’t want to control light by regular wall switch, set to either 3000K or 4000K or 5000K or 6500K in junction box switch.

Finally, we will compress the springs of the LED light and push the fixture in to the hole. We have to squeeze and insert both ends of each spring into their assigned holes.
